
“Why should I clean my stylus? – my vinyl sounds great!“

A neglected stylus before and after cleaning
Your turntable stylus might be tiny, but it plays a massive role in delivering the sound you love. Keeping it clean isn’t just a matter of good maintenance — it’s essential for protecting your vinyl and getting the best possible audio performance.
Over time, dust, debris, and microscopic particles build up on the stylus tip. This not only dulls its ability to track the grooves accurately, but it also turns the stylus into an abrasive element that can wear down the delicate walls of your records. The result? Distorted sound, reduced clarity, and potentially permanent damage to your vinyl collection.
Even a small amount of buildup acts like a cushion between the stylus and the groove, preventing precise contact. This leads to poor tracking, muddied detail, and in some cases, can even cause the stylus to skip — pulling you out of the musical moment.
Regular stylus cleaning keeps the path between the groove and your ears crystal clear. It ensures that the stylus traces every nuance of the recording as intended, preserving both the sound quality and the lifespan of your records. In short: a clean stylus equals better sound, safer records, and a far more rewarding listening experience.
What should I use to clean my stylus?
There are several effective ways to clean a turntable stylus, each with slightly different techniques and tools. Below, we’ve highlighted some of the most popular and widely used methods to help you find the one that suits your setup best.
Whichever method you choose, always handle your tonearm with care. It’s one of the most delicate components of your turntable, and even a small misstep can lead to costly damage. Patience and precision are key.
How do I clean my stylus with a magic eraser?
Using Mr. Clean Magic Erasers as a cost-effective solution for cleaning your stylus can be a convenient option. To utilize them effectively, cut out a small square of the eraser and position it at a comfortable range from the tonearm. With caution, lightly dip the stylus into the eraser, allowing it to remove the majority of the dirt. However, it’s crucial to be aware of a few considerations.
Firstly, avoid wetting the Magic Eraser, as moisture can damage the stylus. Additionally, ensure that you do not purchase chemically treated versions, as these may leave residue or contain substances that could harm the stylus. While this method can be quick and inexpensive, it’s advisable to exercise care and monitor for any potential residue left behind on the stylus after cleaning. RRP 8GBP.

Liquid Stylus Cleaners
Liquid stylus cleaners are available at a price range of 7-12GBP per bottle and have been a subject of debate within the Audiophile community. Some concerns have been raised regarding the potential deterioration of the adhesive that attaches the stylus to the head, as well as the possibility of the fluid traveling up the cantilever and entering the cartridge. However, it is important to note that the majority of online reviews for these cleaners are positive. Many users report that the cleaners effectively remove dust fragments, providing a clean finish to the stylus.
It is always recommended to consult your turntable’s manual before applying any liquids to the stylus, as specific instructions and cautions may vary depending on the manufacturer. By following the guidelines and recommendations provided by the manufacturer, you can make an informed decision on whether to use liquid stylus cleaners for cleaning your stylus.

Carbon Fiber stylus brush
An alternative option for cleaning your stylus is a Carbon Fiber stylus brush, which can be purchased at prices ranging from 4.95 to 15.00GBP. These brushes are designed to remove dirt and debris from the stylus by gently moving the brush forward across it until it is clean. Many of these brushes come with a supplied cleaning liquid, but it’s important to refer to your stylus manual before applying any chemicals to ensure compatibility.
When using the brush, it is advisable to apply only gentle pressure to avoid causing any damage. Vigorous pressure should be avoided as it may potentially harm the delicate stylus. The Carbon Fiber stylus brush offers a convenient and effective cleaning solution, but it’s crucial to handle it with care and follow the instructions provided by the manufacturer and your turntable’s manual.

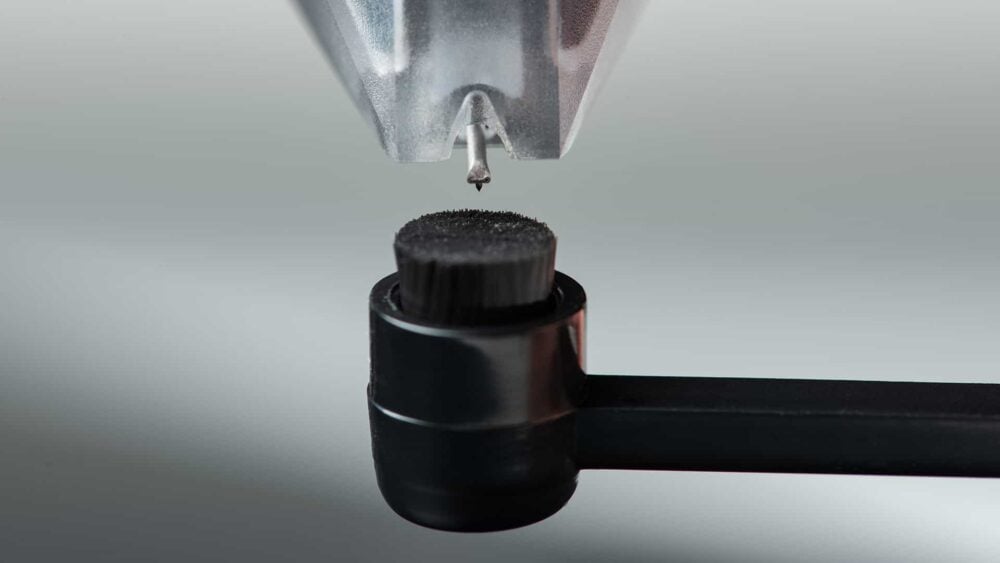
Stylus tip dry cleaning system
The One-touch polymer stylus tip dry cleaning system is a convenient and affordable solution for keeping your turntable stylus clean. Priced at approximately 25.00GBP, this innovative tool offers a safe and easy way to maintain your stylus’s performance. With its user-friendly design, the process is straightforward.
Simply position the tonearm within easy reach of the polymer, carefully lower the cartridge until the stylus needle is inserted into the polymer, and then gently lift it back up. As you do so, the dirt adheres to the polymer surface, leaving your needle clean and ready for optimal playback. The beauty of this system lies not only in its effectiveness but also in its longevity. The washable polymer itself is designed to last well over five years, ensuring you get great value for your money. With its reasonable price point and durable construction, the One-touch polymer stylus tip dry cleaning system is a great accessory for any vinyl enthusiast.

Ultrasonic Stylus cleaner
The Ultrasonic Stylus cleaner is the ‘ultimate’ solution for meticulous stylus cleaning, albeit at a higher price point ranging from 45 to 120GBP. This advanced device offers a sophisticated and effective method to ensure your stylus remains in pristine condition. To use the Ultrasonic stylus cleaner, simply position the device within close range of the tonearm. With a delicate touch, place the stylus onto the small padded circle provided. Once in place, activate the device, allowing it to work its magic for approximately 15 seconds.
The beauty of this technology lies in its selective vibration, which safely removes any residue without the need for brushes or mildly abrasive items that could potentially damage the delicate stylus. With the Ultrasonic stylus cleaner, you can confidently maintain your stylus’s performance without compromising its longevity. Though it comes with a higher price tag, the peace of mind and enhanced cleaning capabilities it provides make it an excellent investment for serious vinyl enthusiasts. Choose the Ultrasonic stylus cleaner for a thorough and safe cleaning experience that takes your stylus care to the next level.

How often should I clean my stylus?
Keeping your stylus clean is key to preserving both sound quality and the life of your vinyl records. While there’s no one-size-fits-all schedule, here are some practical guidelines:
- Inspect Regularly: Use a stylus magnifier or a strong light to check for dust or debris. If you see any buildup, it’s time for a clean.
- Listen Closely: If you notice distortion, loss of clarity, or skipping, a dirty stylus may be the cause.
- Consider Usage: The more often you play records, the more often you should clean your stylus—potentially after every few sessions.
- Check Record Condition: Playing dusty or older records? Clean your stylus more frequently to avoid contamination and preserve performance.
- Use the Right Tools: Always use a proper stylus brush or a gel cleaner designed for phono cartridges. Avoid fingers or rough cloths, which can damage the stylus.
- Dry Clean Often, Wet Clean Occasionally: Dry brushing removes everyday dust. Use a stylus cleaning fluid only occasionally to avoid dissolving adhesives or damaging delicate components.
- Clean Records = Cleaner Stylus: Maintaining clean vinyl drastically reduces stylus contamination and cleaning frequency.
- Avoid Overcleaning: Excessive or aggressive cleaning can cause wear. Stick to gentle strokes in the direction of stylus travel (back to front).
- Store Your Stylus Properly: Always use a dust cover when your turntable isn’t in use to prevent airborne particles from settling on the stylus.
- Log Play Time: If you’re serious about maintenance, consider keeping a rough play-hour log to track when a cleaning or replacement is due.
A good rule of thumb: clean your stylus every 10–15 hours of play, or immediately after playing a visibly dirty record.
Regular maintenance improves sound, extends stylus life, and protects your vinyl.
Disclaimer: This page is merely a guide to cleaning your stylus and Stack Audio takes no responsibility for any damage caused during this process.
View our SERENE Turntable upgrade range:
SERENE Record Mat: www.stackaudio.co.uk/serene-mat
SERENE Record Stabiliser: www.stackaudio.co.uk/serene-stabiliser
